Creating Maud Input files with Fit2d
Maud input files
To process your data with Maud, you will need to have slices of data (e.g. data integrated between azimuth -2.5 and azimuth 2.5, data integrated between azimuth 2.5 and azimuth 7.5...). For each slice, you have a 2 theta / intensity diffraction pattern for use in the Rietveld refinement.
Binning of diffraction data with Fit2d: manual
First, we will use fit2d to obtain one slice of data. This step is necessarey for two reasons:
- we will calibrate the few paramaters needed by fit2d
- it is part of the learning process.
Here's the trick
- Load up your data (or calibration file) into fit2d.
- Select the
cake function, if you just performed your calibration or used the cake function already, you won't get any question. Otherwise, you'll be asked for
- a
beam center, select the best option..
Start azimuth, could be zero if you have full diffraction rings.
End azimuth, could be start+360 if you have full diffraction rings.
Inner Limit, can be beam center, or any point before the rings you're interested in.
Outer Limit, should be after the rings you're interested in.
- In the cake menu, choose
integrate
- First set of questions should be
OK
- In the second set of questions, we want to a slice of data between azimuth -2.5 and azimuth 2.5, integrated onto a 1-D spectrum, therefore
- select -2.5 as
start azimuth
- select +2.5 as
end azimuth
- select 1 as
number of azimuthal bins
- Intensity corrections (be careful with this, new 01/20/2006). There are options in fit2d to apply corrections to the integrated intensity. For the results of fit2d to be compatible with MAUD, you want to set
Intensity conservation to NO and Geometrical corrections to intensity to NO as well. Maud will do the intensity corrections by itself.
- Click
OK and fit2d will integrate your slice of data:
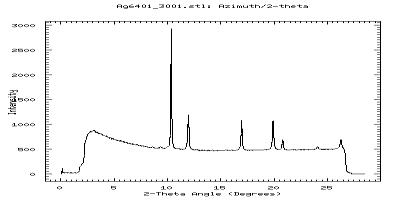 A slice of data in fit2d
- On Linux platforms, there may be a bug: the Y-Axis will be labelled with strange symbols or nothing at all: THIS HAS TO BE CORRECTED!! otherwise the rest of the analysis will crash...
- select
Exit, Options, Z-Axix Label and enter whatever you wish (I like Intensity).
- go back to the
Cake function.
- The data can be saved into a text file, with a
chi extension. Proceed as follow
- Select
Exit, Output, and Chiplot
- Choose your file name.
- Clik
OK.
- Have a look at the file you just created. You can use it for plotting, or post-processing with many kinds of software.
Binning of diffraction data with Fit2d: automatic
For the analysis of radial diffraction patterns, one has to bin the data over a large number of orientations. One could repeat the process above by hand, but 5 degrees slices over 360 degrees represent 72 chi files, so creating them by hand could take a while. Luckily, one can script fit2d and things become easier...
In any case, the process above has to be performed at least once: to calibrate parameters such as inner and outer radius, but also to correct the nasty bug on Z-Axis label on unix platforms.
To create macro files for Fit2d, one can use the sofware Fit2d2maud. Simply download the archive a run it:
- on a mac or windows: double click on the file
- on unix: type
java -jar fit2d2maud.jar
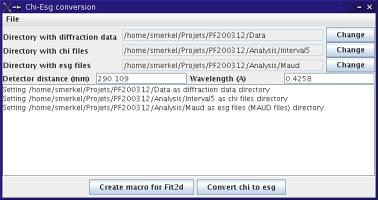 The Fit2d2maud main window
You will be asked to define
- the wavelength and sample to detector distance
- the directory with the diffraction data
- the directory that will contain the
chi files
- the directory that will be used to store the Maud data files
I strongly recommend that you use separate directories for all of those...
Once everything is set up,
- click on
Create Macro for Fit2d
- you'll be asked to define
basename, start azimuth, end azimuth and interval. For instance, if you choose agCalib for basename, 0 for start azimuth, 360 for end azimuth and 5 for interval, the macro will create the following chi files
agCalib_0.chi for a slice integrated between -2.5 and 2.5
agCalib_5.chi for a slice integrated between 2.5 and 7.5
agCalib_10.chi for a slice integrated between 7.5 and 12.5
   ....
agCalib_360.chi for a slice integrated between 357.5 and 2.5
- Macro will be saved in a file
basename.mac in your data directory.
Running the macro
- in fit2d, make sure that you have the image of the 2-D diffraction pattern (play with the
exchange button)
- leave the diffraction mode:
Exit
- enter the macro mode:
Macros / Log file
- select
Run Macro, choose the file you just created (agCalib.mac in my case), and fit2d should go ahead and create the chi files (72 of them if you chose and interval of 5 degrees between 0 and 360 degrees).
Converting chi file series for use in Maud
In Maud, data are stored in a file with an esg extension. They contain all data for all azimuth angles within a single text file. The fit2d2maud software can convert series of chi files into esg:
- click on
Convert Chi to Esg
- enter your
basename, start azimuth, end azimuth and interval.
- click
OK.
Fit2d2maud will read all chi files and create a big esg file for use in Maud. In my case, I have 72 chi files, each of them is 50 kbytes, and the esg file is 2.3 Mbytes, so it takes a few seconds... but it works.