CalibrationWithFit2d
On the use of a standard
First steps
If you did your experiment properly, you should
- know the wavelength at which you performed your experiment,
- have the diffraction image from a standard.
Calibration
The diffraction image from the standard is used to calibrate many things such as detector tilt or beam to detector distance. In Fit2d,
- go into the
Powder Diffraction (2-D)submenu - select the
Inputbutton, and choose the diffraction image from your standard. Dark field,flat field, andspatial distortion correctiondepend on the experimental setup. In general, data from Rigaku or Mar345 image plates do not require any correction, but you should talk with your beamline scientist for more information.
Once the data is loaded into fit2d, you can calibrate your experiment as follow
- select
Calibrant, - select the material you used or, if not on the list,
User Defined, - if you selected
User Defined. you will need to create an input file with the d-spacings of your material, one after the other, and one per line. For instance, this is an input file corresponding to silver
2.35917
2.04310
1.44469
1.23204
1.17958
1.0215
0.9374
0.9137
0.8341
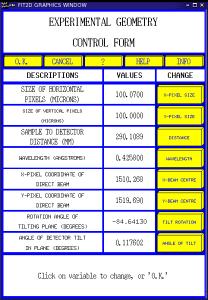
Fit2d Calibration Results
- In the following panel, enter an approximate sample to detector distance, the correct wavelength and pixel sizes. You will refine the beam center, detector distance, and detector tilt. You will not refine the wavelength.
- You will be asked to select a few points along the inner ring. Do so (about 6 of them, and all around the ring if possible). And let it go.
- At this point, fit2d should be able to work alone and calculate a calibration. To obtain the numerical results, click on
Integrateand you should see a panel like this one.
Calibration check...
You still need to make sure that your calibration is Ok... Sometimes, things can go wrong and you HAVE to catch it now otherwise your whole analysis will be wrong!
Calibration check is done visually with the Cake function:
- In the main
Image Processing Menu. Choose theCakefunction. - When asked what to do with the beam center, select
No Change Start azimuthshould be zero if you have full diffraction rings.End azimuthshould be start+360 if you have full diffraction rings.Inner Limitcan be beam center, or any point before the rings you're interested in.Outer Limitshould be after the rings you're interested in.- In the cake function main menu, choose
Integrate. - First set of numbers should be
OK. - Second set of numbers should be
OKas well.
You should get an image like this one:
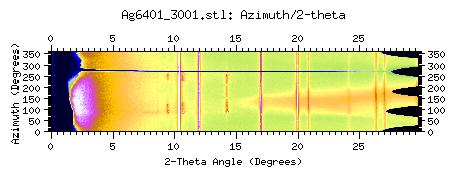
Cake Image in Fit2d
Make sure that all rings became straight lines (zoom-in, test... really carefully). If they're not: something is wrong with your calibration. Sometimes (on Linux for instance) zooming functions seem to be crashing: simply remove the double-click option and you'll be fine.
To go back to the main diffraction menu with fit2d, click on Exchange and Exit. You're ready for the next step!